Commissioning a custom portrait is one of the most deeply personal and emotional investments you can make. Whether it is a charcoal sketch to honor a loved one, a vibrant pencil portrait for an anniversary, or a sprawling family artwork, the foundation of every breathtaking masterpiece is exactly the same: the reference photo.
As an artist who has drawn hundreds of portraits, I can tell you that my pencils and charcoal are only as good as the reference material provided. A breathtakingly detailed drawing requires a breathtakingly clear photo. But what exactly makes a photo "good" for a portrait? Is it just about high resolution? Or is there something more?
In this comprehensive, 2000-word guide, we are going to dive deep into the anatomy of the perfect reference photo. By the end of this article, you will know exactly how to select, capture, and curate the best possible images to ensure your custom artwork exceeds your wildest expectations.
Rule 1: Lighting is Everything (The Enemy of Good Art is Flat Flash)
If there is a golden rule in fine art, it is that light creates form. When an artist looks at a face, they aren't just seeing eyes, a nose, and a mouth; they are seeing a complex topography of highlights, midtones, core shadows, and cast shadows. The interplay between light and dark is what allows a two-dimensional sheet of paper to transform into a three-dimensional, lifelike face.
Natural Light vs. Artificial Light
The best photos are almost always taken in natural light. Natural sunlight, specifically the soft, diffused light found near a large window or outside on a slightly overcast day, wraps around the human face beautifully. It creates gentle gradients from light to dark, highlighting bone structure and the natural curve of the cheeks.
On the other hand, artificial indoor lighting—especially harsh overhead fluorescent lights—can cast unflattering, deep shadows under the eyes and nose, giving the subject an exhausted or stark appearance. Worse yet is the dreaded on-camera flash. A direct flash blasts away all shadows, flattening the face completely. Without shadows, an artist has no geographical map of the face. A flatly lit photo results in a flat, uninteresting drawing, regardless of the artist's skill level.
Understanding Directional Lighting (Chiaroscuro)
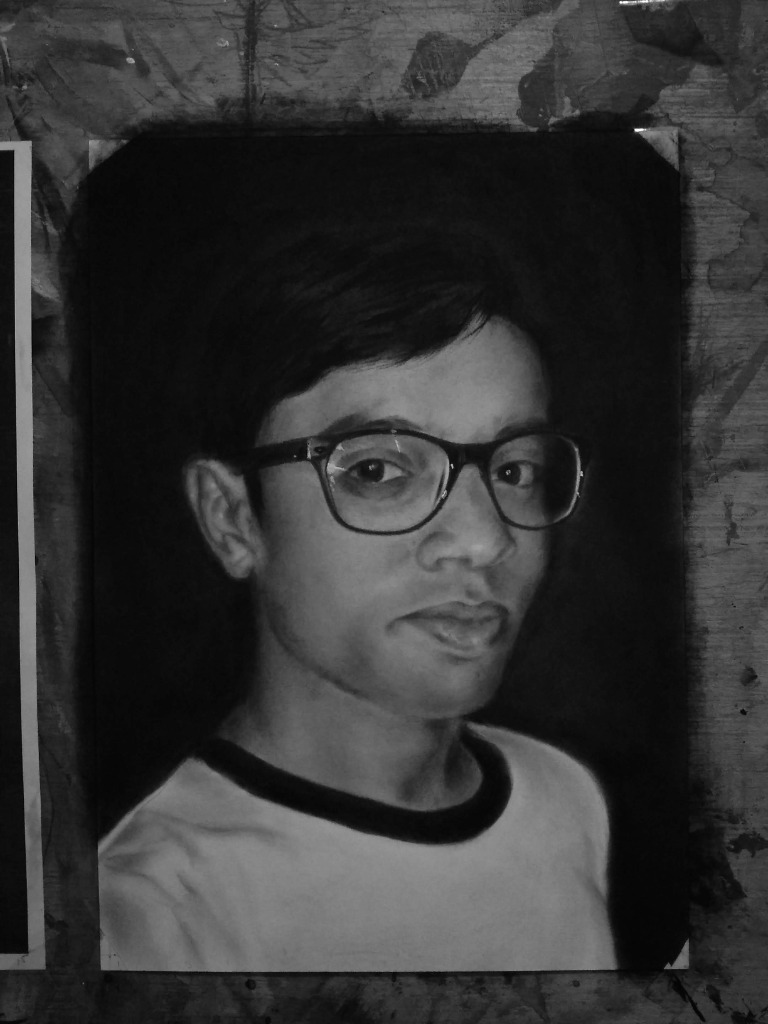
Have you ever noticed how classical Renaissance paintings look so dramatic and lifelike? That is due to chiaroscuro, the strong contrast between light and dark. For a spectacular custom portrait, look for photos where the light is coming from a 45-degree angle. This creates a distinct "light side" and "shadow side" of the face. It reveals the depth of the eye sockets, the bridge of the nose, and the texture of the hair.
Artist's Pro-Tip on Lighting:
When looking through your camera roll, find a photo where one side of the subject's face is slightly brighter than the other. Look for a small triangle of light on the shadowed cheek (known as Rembrandt lighting). This type of lighting creates the most captivating and three-dimensional custom pencil sketches.
Rule 2: High Resolution and Sharp Details (The "Eye Test")
The second pillar of a great reference photo is resolution. In the age of social media, we are constantly taking, sending, and saving photos. However, the journey a photo takes from a camera to an app to a screenshot severely degrades its quality.
The "Eye Test": Can You See the Soul?
I always tell my clients to perform "The Eye Test." Open your photo on your phone or computer and zoom in as far as you can on the subject's eyes. What do you see?
Can you see the catchlights (the tiny reflections of light in the pupil)? Can you see the distinct shape of the eyelids, the direction of the eyelashes, and the subtle shading of the iris? If the eyes become a blurry, pixelated mush of color when you zoom in, the photo is too low-resolution for a highly detailed realistic portrait.
The eyes are the windows to the soul. In portraiture, if you capture the eyes perfectly, the drawing comes alive. If you have to guess the shape of the eyes due to a blurry photo, the likeness will always be slightly off.
Beware of Filters and Social Media Compression
Platforms like WhatsApp, Instagram, and Facebook compress images heavily to save server space. An image that looked incredibly sharp on your phone might lose 80% of its data when sent via a messaging app. Furthermore, Snapchat and Instagram filters alter facial proportions. They artificially enlarge eyes, smooth out skin textures, and narrow the jawline. Drawing a filtered photo results in a drawing of a filter, not a drawing of the actual person.
Always try to send the original camera file via email or through a high-quality document transfer rather than a screenshot from social media.
Rule 3: Capturing Genuine Facial Expressions
A portrait is not just a geographical record of a person's facial features; it is a capture of their spirit, their personality, and their unique essence. This is why the facial expression in your reference photo is critically important.
The Fake Smile vs. The Candid Moment
We have all been conditioned to say "Cheese!" and flash a wide, toothy smile whenever a camera points our way. While these photos are great for family albums, they aren't always the best for fine art. Forced smiles often look stiff. The eyes do not crinkle in the way they do during a genuine laugh, and the muscles in the neck and jaw tense up unnaturally.
Instead, look for candid moments. A soft, relaxed resting face, a subtle half-smile, or a photo taken mid-laugh where the joy is reaching all the way to the eyes. These candid moments translate beautifully into art because they capture the person exactly as their loved ones know them.
Posture and Body Language
Do not just focus on the face; look at the angle of the head and the posture of the shoulders. A slight tilt of the head can convey warmth and empathy, while a straight-on, passport-style mugshot can feel overly formal and rigid. If the portrait includes hands (for instance, hands resting on a chin or holding a baby), ensure those are clearly visible, as hands are incredibly expressive elements in art.
Rule 4: Combining Multiple Photos (The Magic of Custom Art)
One of the most beautiful aspects of commissioning a hand-drawn portrait rather than just printing a photo is the artist's ability to bend reality. Often, the perfect photo simply does not exist. Perhaps you want a family portrait, but you can never get all the kids to look at the camera at the same time. Or perhaps you want something much more profound.
Compilation and Memorial Portraits
Some of the most emotionally impactful pieces I create are compilation portraits—bringing together individuals from different photographs into one cohesive, unified drawing. This is incredibly popular for memorial portraits, where a client wishes to see a recently passed grandparent holding a newborn grandchild they never had the chance to meet in life.
When selecting photos to be combined, you need to follow a few specific guidelines:
- Consistent Eye Levels: Try to find photos where both subjects are photographed from roughly the same angle. If one photo is taken from above looking down, and another is taken from below looking up, combining them will look anatomically incorrect.
- Consistent Lighting Direction: If the light in Photo A is coming from the left, and the light in Photo B is coming from the right, the artist will have to artificially invent shadows to make them match, which can reduce realism.
- Proportional Referencing: Let the artist know the height differences between the subjects in real life so they can scale the heads accurately in the final drawing.
Common Photo Mistakes to Avoid
To summarize, here is a quick checklist of the most common mistakes to avoid when digging through your archives for the perfect reference picture:
- ❌ The Distant Subject: Photos where the person is standing far away in a landscape. Zooming in will just create a blurry mess.
- ❌ Heavy Shadows Over the Face: Photos taken outdoors at high noon where harsh sunlight causes deep black shadows under the nose and eyes.
- ❌ Cut-Off Features: Photos where the top of the head or the chin is cropped out of the frame. (While artists can invent hair, it's harder to guess facial structures).
- ❌ Overexposure: Photos that are so bright that the nose bridge completely disappears into white light.
- ❌ Group Selfies: Selfies often distort facial features (the "fisheye" effect) due to the wide-angle lens being too close to the face.
Ideal Photo Types for Specific Portrait Gifts
Different occasions sometimes call for different types of reference photos. Here is how to approach photo selection based on the specific gift you are commissioning:
1. Photos for Wedding Portraits
For a wedding portrait gift, professional photography is your best friend. Professional photographers understand lighting, composition, and high resolution. Choose a photo that captures an intimate moment—perhaps the first dance, a candid laugh during the speeches, or a quiet moment of the couple looking at each other rather than staring at the camera. Professional wedding photos make for the most stunning, detailed charcoal and pencil artworks.
2. Photos for Anniversary Gifts
When selecting a photo for an anniversary portrait gift, nostalgia plays a huge role. Many clients want a drawing of their parents from 30 or 40 years ago. Vintage photographs can be challenging because they are often blurry, grainy, or faded. In these cases, it is vital to scan the vintage photo at the highest DPI (Dots Per Inch) possible. Do not just take a photo of the old photo with your smartphone, as this introduces glare and reduces quality.
3. Photos for Solo Custom Sketches
If you are commissioning a custom pencil sketch from a photo for a birthday or personal milestone, you have the freedom to focus entirely on personality. Look for dynamic lighting, a hobby they love (like playing a guitar or holding a pet), and a relaxed, genuine expression.
Not Sure if Your Photo is Good Enough?
I understand that finding the "perfect" photo can be stressful, especially if it is a surprise gift or a memorial piece where photo options are limited.
You do not have to guess. I offer a 100% Free Photo Consultation via WhatsApp before you ever pay a single rupee. Send me the 3 or 4 photos you are debating between, and I will personally review them. I will tell you which one will translate best into a stunning piece of art, or I will let you know if we need to combine different elements from multiple photos.
Get Free WhatsApp ConsultationTap the button above to chat directly with the artist.
Conclusion: Trust Your Artist
Choosing the perfect reference photo is the most crucial step in commissioning a custom portrait. By prioritizing good directional lighting, high resolution, and genuine emotional expressions, you give the artist the ultimate toolkit to create a masterpiece.
However, if your photos aren't perfect—perhaps they are old, slightly blurry, or you need multiple people combined—do not lose hope. Experienced portrait artists have a deep understanding of human anatomy and can often fill in the blanks. The key is communication. Send your photos, discuss your vision, and trust in the collaborative process of bringing your memories to life on paper.